








Published 9 November 2026 · OFM4x4.co.uk
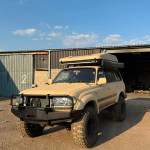
Changing ride height or routinely carrying a heavy rear load can change where dipped beams point. The result affects the driver's view and other road users.
The quick answer
Have headlamp aim checked with suitable equipment after a lift, replacement lamp or material change in normal vehicle loading. Use the vehicle's levelling controls as its handbook directs.
Establish normal loading
Record tyre pressures, fuel and the vehicle's typical fixed accessories before testing. A temporary overloaded boot is not a sound reference for a permanent adjustment. Restore the normal setup before comparing results.
Inspect the lamp first
Check that both units are securely mounted, lenses are sound and the correct light source is fitted for the unit. A loose bracket or damaged adjuster cannot be corrected by turning the aim screw alone.
Use a proper beam check
The UK MOT manual sets inspection criteria for headlamp aim and light-source compatibility. A wall mark at home may flag a gross change, but calibrated equipment is the dependable way to set and verify the beam.
Recheck after changes
If the suspension settles, a rear accessory is added or a headlamp unit is changed, repeat the check. Keep the installer or MOT station's measurement with the vehicle record.
Specification checklist
Before ordering or booking work, have these details ready: Vehicle year, suspension change, lamp type, normal fixed load and levelling-control setting.
Frequently asked questions
Will a lift always make the lamps point higher?
Not always. Front and rear height changes differ, so measure the beam rather than guessing.
For an application check, contact OFM4x4.co.uk with the vehicle and component details above. Confirm the current fitting instructions for the exact product before work starts.
Technical reference: www.gov.uk. The relevant product manual takes priority over general guidance.
Related Products


Leave a comment